[03] Windows에 PostgreSQL 설치 방법
PostgreSQL 버전 8.0부터 윈도우 설치 프로그램을 사용하여 설치 프로세스를 상당히 쉽게 할 수 있습니다.
이 기사에서는 Windows 10에 PostgreSQL 버전 11.3을 설치합니다.
PostgreSQL 설치에는 다음과 같은 세 가지 중요한 단계가 있습니다.
1. Windows용 PostgreSQL 설치 프로그램 다운로드
2. PostgreSQL 설치
3. 설치 확인
Windows용 PostgreSQL 설치 프로그램 다운로드
여기를 클릭하여 Windows에 맞는 안정적인 최신 PostgreSQL 설치 프로그램을 다운로드할 수 있습니다.
https://www.enterprisedb.com/downloads/postgres-postgresql-downloads
Community DL Page
Note: EDB no longer provides Linux installers for PostgreSQL 11 and later versions, and users are encouraged to use the platform-native packages. Version 10.x and below will be supported until their end of life. For more information, please see this blog p
www.enterprisedb.com
PostgreSQL 설치 프로그램 설치
설치 프로그램을 다운로드한 후 두 번 클릭하고 다음 단계를 따르십시오.
- Step 1: Click the Next button. 다음 버튼을 클릭합니다.

- Step 2: Choose the installation folder, where you want PostgreSQL to be installed, and click on Next.
- 2단계: PostgreSQL을 설치할 설치 폴더를 선택하고 다음을 클릭합니다

- Step 3: Select the components as per your requirement to install and click the Next button.
- 3단계: 설치 요구 사항에 따라 구성 요소를 선택하고 다음 버튼을 클릭합니다.

- Step 4: Select the database directory where you want to store the data and click on Next.
- 4단계: 데이터를 저장할 데이터베이스 디렉토리를 선택하고 다음을 클릭합니다.

- Step 5: Set the password for the database superuser (Postgres)
- 5단계: 데이터베이스 수퍼유저(Postgres)의 비밀번호 설정

- Step 6: Set the port for PostgreSQL. Make sure that no other applications are using this port. If unsure leave it to its default (5432) and click on Next.
- 6단계: PostgreSQL용 포트를 설정합니다. 다른 응용 프로그램이 이 포트를 사용하고 있지 않은지 확인하십시오. 잘 모르겠으면 기본값(5432)으로 두고 다음을 클릭합니다.

- Step 7: Choose the default locale used by the database and click the Next button.
- 7단계: 데이터베이스에서 사용하는 기본 로케일을 선택하고 다음 버튼을 클릭합니다.

- Step 8: Click the Next button to start the installation.
- 8단계: 다음 버튼을 클릭하여 설치를 시작합니다.

- Wait for the installation to complete, it might take a few minutes.
- 설치가 완료될 때까지 기다리십시오. 몇 분 정도 걸릴 수 있습니다.

- Step 9: Click the Finish button to complete the PostgreSQL installation.
- 9단계: 마침 버튼을 클릭하여 PostgreSQL 설치를 완료합니다.

PostgreSQL 설치 확인
pgAdmin 또는 psql과 같은 일부 클라이언트 애플리케이션을 사용하여 데이터베이스 서버에 연결하는 것과 같이 PostgreSQL 설치를 확인하는 몇 가지 방법이 있습니다.
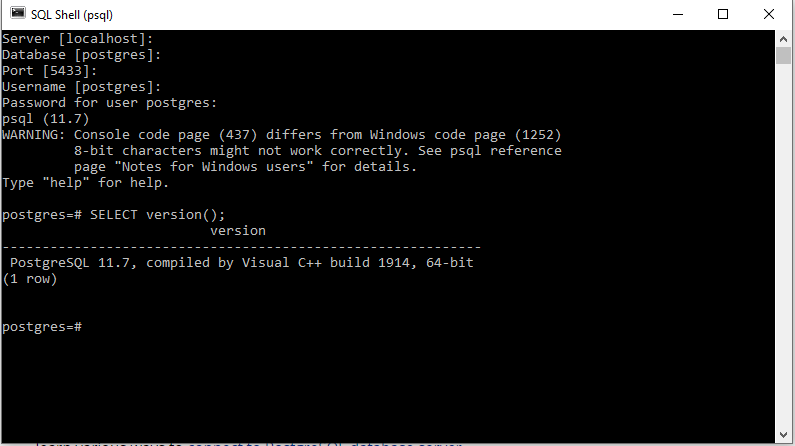
가장 빠른 방법은 psql 셸을 사용하는 것입니다. 이를 위해 아래 단계를 따르십시오.
1단계: Windows 검색 표시줄에서 psql 셸을 검색하고 엽니다.
2단계: 서버, 데이터베이스, 포트, 사용자 이름 및 암호를 입력하고 Enter 키를 누릅니다.
3단계: SELECT version() 명령을 사용합니다. 다음 결과가 표시됩니다.

'공부 > PostgreSQL' 카테고리의 다른 글
| [06] PostgreSQL – 데이터베이스 로드 (0) | 2023.04.11 |
|---|---|
| [05] PostgreSQL – 데이터베이스 생성 (0) | 2023.04.11 |
| [04] Mac에 PostgreSQL 설치 방법 (0) | 2023.04.11 |
| [02] PostgreSQL이란 -02 (0) | 2023.04.10 |
| [01] PostgreSQL이란 - 01 (0) | 2023.04.10 |


댓글