지문 (fingerprint) 일치 알고리즘 구현하기 (Python)
0. OpenCV 특징 매칭 (Feature Matching) 알고리즘 종류
A. Brute-Force Matching with ORB detector
|
1
2
3
4
5
6
7
8
9
10
11
12
13
14
15
16
17
18
19
20
|
import numpy as np
import cv2 as cv
import matplotlib.pyplot as plt
img1 = cv.imread('box.png',cv.IMREAD_GRAYSCALE) # queryImage
img2 = cv.imread('box_in_scene.png',cv.IMREAD_GRAYSCALE) # trainImage
# Initiate ORB detector
orb = cv.ORB_create()
# find the keypoints and descriptors with ORB
kp1, des1 = orb.detectAndCompute(img1,None)
kp2, des2 = orb.detectAndCompute(img2,None)
# create BFMatcher object
bf = cv.BFMatcher(cv.NORM_HAMMING, crossCheck=True)
# Match descriptors.
matches = bf.match(des1,des2)
# Sort them in the order of their distance.
matches = sorted(matches, key = lambda x:x.distance)
# Draw first 10 matches.
img3 = cv.drawMatches(img1,kp1,img2,kp2,matches[:10],None,flags=cv.DrawMatchesFlags_NOT_DRAW_SINGLE_POINTS)
plt.imshow(img3),plt.show()
|
cs |
거리 측정 cv.NORM_HAMMING를 사용하여 BFMatcher 객체를 만듭니다. 그리고 crossCheck는 더 나은 결과를 위해 True로 설정됩니다.그런 다음 Matcher.match() 방법을 사용하여 두 이미지에서 최상의 매칭을 얻습니다. 거리순으로 정렬하여 (낮은 거리에서) 최상의 매치가 앞으로 오도록 합니다. 그런 다음 처음 10개의 매치만 draw합니다(가시성을 위해).

B. Brute-Force Matching with SIFT detector and Ratio test
|
1
2
3
4
5
6
7
8
9
10
11
12
13
14
15
16
17
18
19
20
21
|
import numpy as np
import cv2 as cv
import matplotlib.pyplot as plt
img1 = cv.imread('box.png',cv.IMREAD_GRAYSCALE) # queryImage
img2 = cv.imread('box_in_scene.png',cv.IMREAD_GRAYSCALE) # trainImage
# Initiate SIFT detector
sift = cv.SIFT_create()
# find the keypoints and descriptors with SIFT
kp1, des1 = sift.detectAndCompute(img1,None)
kp2, des2 = sift.detectAndCompute(img2,None)
# BFMatcher with default params
bf = cv.BFMatcher()
matches = bf.knnMatch(des1,des2,k=2)
# Apply ratio test
good = []
for m,n in matches:
if m.distance < 0.75*n.distance:
good.append([m])
# cv.drawMatchesKnn expects list of lists as matches.
img3 = cv.drawMatchesKnn(img1,kp1,img2,kp2,good,None,flags=cv.DrawMatchesFlags_NOT_DRAW_SINGLE_POINTS)
plt.imshow(img3),plt.show()
|
cs |

C. FLANN based Matcher
FLANN: Fast Library for Approximate Nearest Neighbors
|
1
2
3
4
5
6
7
8
9
10
11
12
13
14
15
16
17
18
19
20
21
22
23
24
25
26
27
28
29
30
31
32
33
34
35
36
37
|
FLANN_INDEX_KDTREE = 1
index_params = dict(algorithm = FLANN_INDEX_KDTREE, trees = 5)
FLANN_INDEX_LSH = 6
index_params= dict(algorithm = FLANN_INDEX_LSH,
table_number = 6, # 12
key_size = 12, # 20
multi_probe_level = 1) #2
import numpy as np
import cv2 as cv
import matplotlib.pyplot as plt
img1 = cv.imread('box.png',cv.IMREAD_GRAYSCALE) # queryImage
img2 = cv.imread('box_in_scene.png',cv.IMREAD_GRAYSCALE) # trainImage
# Initiate SIFT detector
sift = cv.SIFT_create()
# find the keypoints and descriptors with SIFT
kp1, des1 = sift.detectAndCompute(img1,None)
kp2, des2 = sift.detectAndCompute(img2,None)
# FLANN parameters
FLANN_INDEX_KDTREE = 1
index_params = dict(algorithm = FLANN_INDEX_KDTREE, trees = 5)
search_params = dict(checks=50) # or pass empty dictionary
flann = cv.FlannBasedMatcher(index_params,search_params)
matches = flann.knnMatch(des1,des2,k=2)
# Need to draw only good matches, so create a mask
matchesMask = [[0,0] for i in range(len(matches))]
# ratio test as per Lowe's paper
for i,(m,n) in enumerate(matches):
if m.distance < 0.7*n.distance:
matchesMask[i]=[1,0]
draw_params = dict(matchColor = (0,255,0),
singlePointColor = (255,0,0),
matchesMask = matchesMask,
flags = cv.DrawMatchesFlags_DEFAULT)
img3 = cv.drawMatchesKnn(img1,kp1,img2,kp2,matches,None,**draw_params)
plt.imshow(img3,),plt.show()
|
cs |
대규모 데이터 세트에서 가장 빠른 인접 이웃 검색 및 고차원 기능에 최적화된 알고리즘 컬렉션을 포함하고 있다. 대규모 데이터셋의 경우 BFMatcher보다 더 빠르게 작동합니다.
FLANN 기반 매처의 경우 사용할 알고리즘과 관련 매개 변수 등을 지정하는 두 개의 사전을 전달해야 합니다. 첫 번째는 IndexParams입니다. 다양한 알고리즘의 경우 전달해야 할 정보가 FLANN 문서로 설명됩니다.
두 번째는 SearchParams입니다. 인덱스의 트리를 반복적으로 통과하는 횟수를 지정합니다. 값이 높을수록 정밀도는 높아지지만 시간도 더 걸립니다. 값을 변경하려면 search_params = dict(dict=100)를 전달합니다.

1. 데이터 셋 다운로드

Sokoto Coventry 지문 데이터 세트(SOCOFing)는 학술 연구 목적으로 설계된 생체 인식 지문 데이터베이스이다. SOCOFing은 600명의 아프리카 피사체의 6,000개의 지문 이미지로 구성되며 성별, 손, 손가락 이름 라벨과 같은 고유한 속성을 포함하고 있으며, 세 가지 수준의 변화, 중심 회전 및 Z-cut을 합성적으로 변형한 버전을 포함하고 있습니다.
https://www.kaggle.com/ruizgara/socofing

2. 라이브러리
|
1
2
3
4
|
!pip install opencv-python
import os
import cv2
|
cs |
3. 특징 매칭 알고리즘 선택
FLANN 알고리즘을 선택했습니다. 간단한 이유는 FLANN 알고리즘이 대용량 데이터셋에 가장 적합하고 현재까지 성능이 가장 좋기 때문입니다.

4. Code
Target Image 선택
|
1
2
|
sample = cv2.imread("archive/SOCOFing/Altered/Altered-Easy/101__M_Left_ring_finger_Obl.BMP")
sample = cv2.resize(sample, None, fx=2.5, fy=2.5)
|
cs |
Target Image와 가장 유사한 이미지 찾기
|
1
2
3
4
5
6
7
8
9
10
11
12
13
14
15
16
17
18
19
20
21
22
23
24
25
26
27
28
29
30
31
32
|
for file in [file for file in os.listdir("archive/SOCOFing/Real")][:3000]:
if counter % 50 == 0:
print(counter)
print(file)
counter = counter + 1
fingerprint_image = cv2.imread("archive/SOCOFing/Real/" + file)
sift = cv2.SIFT_create()
keypoints_1, descriptors_1 = sift.detectAndCompute(sample, None)
keypoints_2, descriptors_2 = sift.detectAndCompute(fingerprint_image, None)
matches = cv2.FlannBasedMatcher({'algorithm': 1, 'trees': 10},
{}).knnMatch(descriptors_1, descriptors_2, k=2)
match_points = []
for p, q in matches:
if p.distance < 0.25 * q.distance:
match_points.append(p)
keypoints = 0
if len(keypoints_1) < len(keypoints_2):
keypoints = len(keypoints_1)
else:
keypoints = len(keypoints_2)
if len(match_points) / keypoints * 100 > best_score:
best_score = len(match_points) / keypoints * 100
filename = file
image = fingerprint_image
kp1, kp2, mp = keypoints_1, keypoints_2, match_points
|
cs |
5. 결과

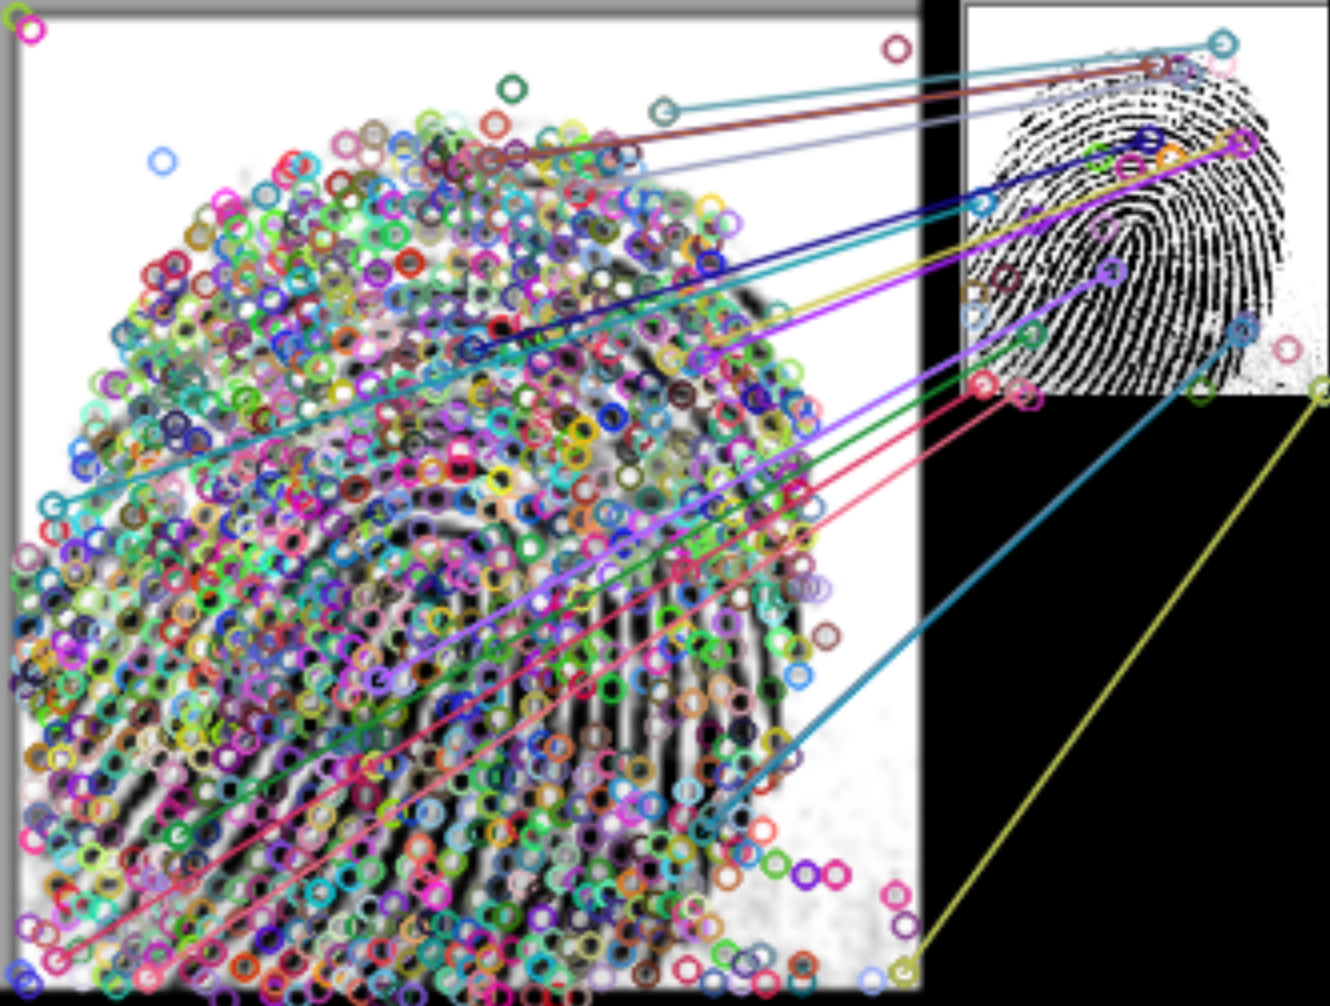
Score: 61.09

Score: 30.01
score는 낮지만 결과적으로, 약 16,000개 지문 이미지 중에서 가장 유사한, 동일한 이미지를 잘 찾아냈다!!
Score를 인위적으로 높이고 싶다면, 아래와 같이 threshold를 지정하면 된다. 현재 0.25로 지정되어 있는 threshold를 높이면 정확도는 낮아지지만 score의 벽은 낮아지고 관대해지기 때문에 전반적인 score는 높일 수 있다.
Full Code
|
1
2
3
4
5
6
7
8
9
10
11
12
13
14
15
16
17
18
19
20
21
22
23
24
25
26
27
28
29
30
31
32
33
34
35
36
37
38
39
40
41
42
43
44
45
46
47
48
49
50
51
52
53
54
55
56
57
58
59
60
61
62
63
64
65
|
# Tutorial video: https://youtu.be/IIvfqfKkiio
# Kaggle Dataset: https://www.kaggle.com/ruizgara/socofing
# Explanation: https://datahacker.rs/feature-matching-methods-comparison-in-opencv/
import os
import cv2
sample = cv2.imread("archive/SOCOFing/Altered/Altered-Easy/101__M_Left_ring_finger_Obl.BMP")
sample = cv2.resize(sample, None, fx=2.5, fy=2.5)
best_score = 0
filename = None
image = None
kp1, kp2, mp = None, None, None
counter = 0
for file in [file for file in os.listdir("archive/SOCOFing/Real")][:3000]:
if counter % 50 == 0:
print(counter)
print(file)
counter = counter + 1
fingerprint_image = cv2.imread("archive/SOCOFing/Real/" + file)
sift = cv2.SIFT_create()
keypoints_1, descriptors_1 = sift.detectAndCompute(sample, None)
keypoints_2, descriptors_2 = sift.detectAndCompute(fingerprint_image, None)
matches = cv2.FlannBasedMatcher({'algorithm': 1, 'trees': 10},
{}).knnMatch(descriptors_1, descriptors_2, k=2)
match_points = []
for p, q in matches:
if p.distance < 0.25 * q.distance:
match_points.append(p)
keypoints = 0
if len(keypoints_1) < len(keypoints_2):
keypoints = len(keypoints_1)
else:
keypoints = len(keypoints_2)
if len(match_points) / keypoints * 100 > best_score:
best_score = len(match_points) / keypoints * 100
filename = file
image = fingerprint_image
kp1, kp2, mp = keypoints_1, keypoints_2, match_points
print(filename)
print("**SCORE: " + str(best_score))
try:
result = cv2.drawMatches(sample, kp1, image, kp2, mp, None)
result = cv2.resize(result, None, fx=4, fy=4)
cv2.imshow("Result", result)
cv2.waitKey(0)
cv2.destroyAllWindows()
except:
print("Something went wrong")
|
cs |
'공부 > 파이썬 Python' 카테고리의 다른 글
| Pygorithm으로 알고리즘 공부하기 (0) | 2022.03.17 |
|---|---|
| Python 대역폭 모니터 만들어보기 (Bandwidth Monitor Using Python) (0) | 2022.03.17 |
| GridSearchCV로 하이퍼파라미터 튜닝하기 (0) | 2022.02.22 |
| Python Django 파이썬 장고 프로젝트 생성 방법 (0) | 2022.02.02 |
| Python Django 파이썬 장고 설치 방법 (0) | 2022.02.02 |


댓글